7 DIY Christmas Baubles

Morning Beautifuls,

I’ve been in a creative mood this week on my days off, getting the Christmas spirit through Christmas DIYs.

One of my favourite so far that I wanted to share with you a DIY decorative Baubles. Well, 7 different baubles DIYs you can do with those clear, plastic (or glass!) baubles you usually see at craft shops at this time of year.

I managed to grab a pack of 9 plastic baubles from Lincraft for about $3.00 – bargain!

img_2115

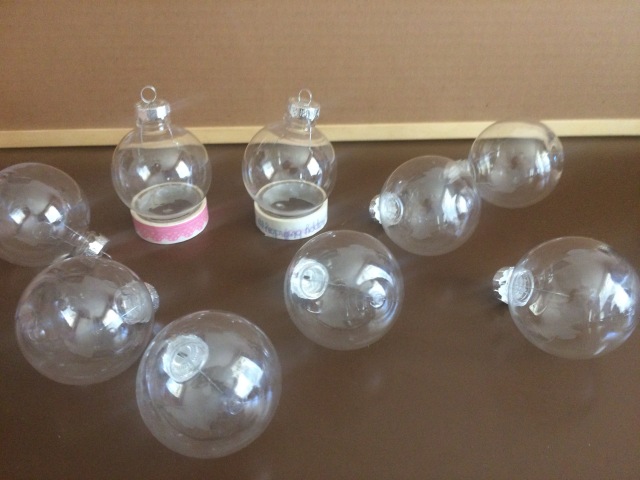
Then it was time  to get creative!

  1. Dip-dyed Christmas bauble
    All you need for this bauble is a bowl of water and your favourite Christmas coloured nail polished. Pour some of your nail colour into your bowl of water and then dip you bauble into the water and swirl it around. The nail polish will stick to the bauble in a colourful design!
    img_2140
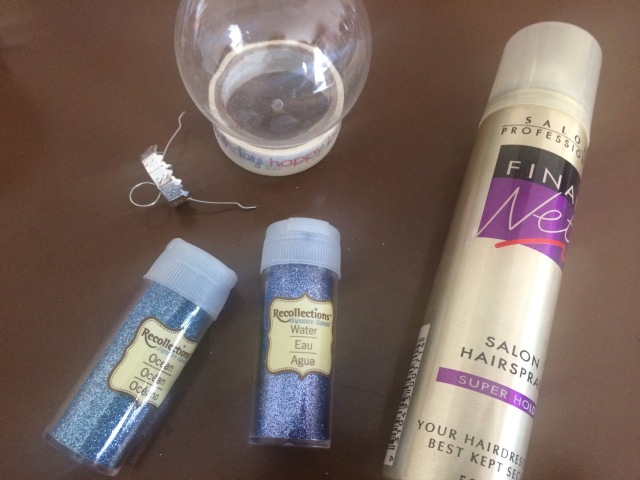
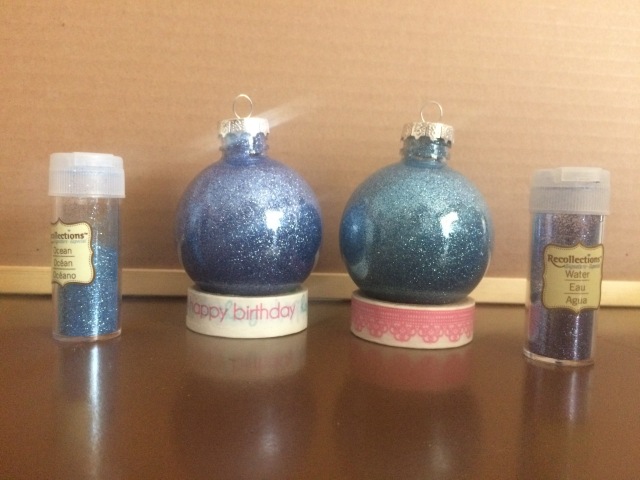
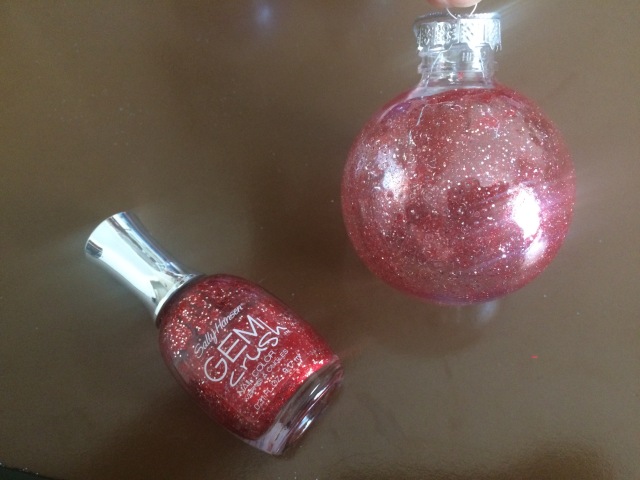
  2. Glitter filled baubles
    This was probably may favourite bauble design – hence why I ended up making two instead of one! Firstly, spray the inside of the bauble with hairspray – or some static stick spray (say that ten times fast!) – and then pour a generous amount of your favourite colour glitter into the bauble. Place your finger over the opening and shake it around until the inside is all coated! I really love the final product of this – sparkly and pretty baubles! My camera, not so much! It kept having a bit of a panic over the glitter intensity!
    img_2117
    img_2121
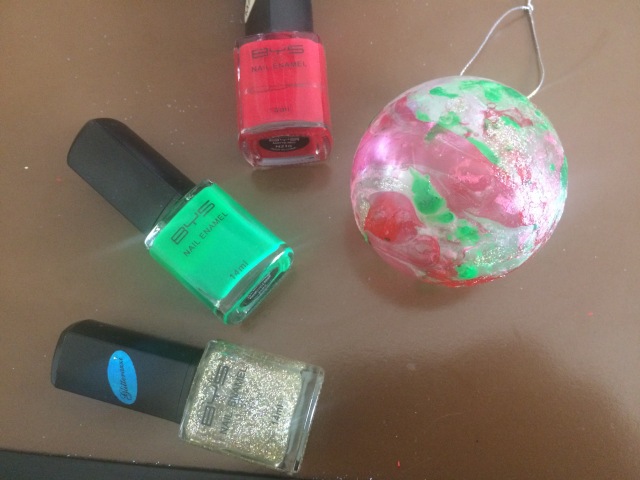
  3. Swirling Nail Polish Bauble
    Another simple bauble design! Pour your favourite colour nail polish into a bauble and swirl it around to create a marbled effect within the bauble. I found that adding reds and glitters created an awesome swirl inside the bauble.
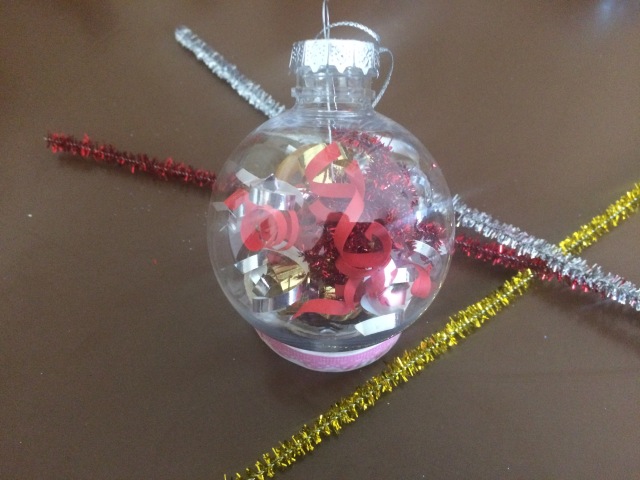
    img_2138
  4. Ribbon Curls Bauble
    You know all those off cuts of ribbon and tinsel that you never know what to do? Well, curl them into swirls and pop them into a bauble. You’ll be surprise how quick they will turn into awesome Christmas decorations!
    img_2143
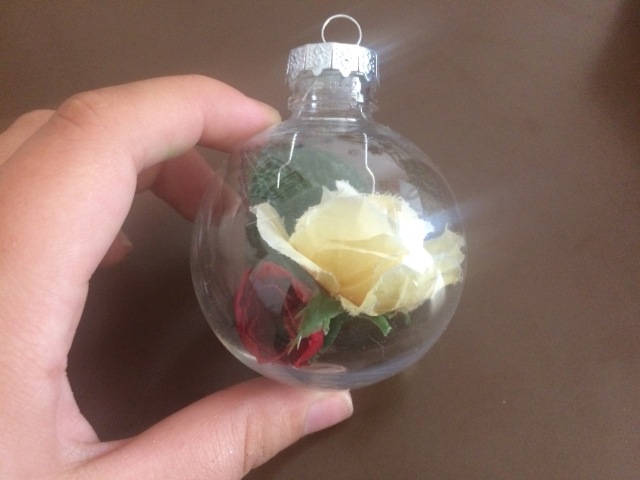
  5. A Rose Garden Bauble
    Create a cute little Christmas garden in a bauble. This one was a bit more fiddly than the others but I really love the final, sophisticated bauble that I ended up with. Using some plastic flowers and leaves, pop them into a bauble and then use a pen – or something similar – to move them around until you are happy with their placement! Ta-da! Cute Christmas Garden bauble.
    img_2125
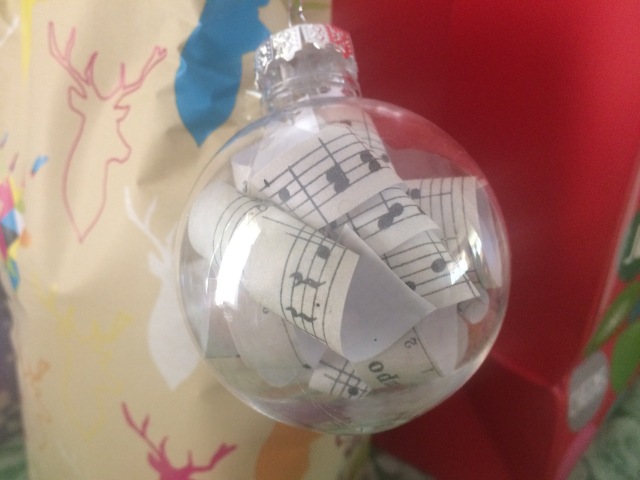
  6. Christmas Song Bauble
    This was a little bit of fun and turned out incredible! All you need is a page of music – or, if like me you didn’t want to chop up a lovely page of music, photocopy! – and a pen/pencil/something that you can curl paper around. Cut the music into strips and wrap around a pen (or similar) to create a cute little curl! Pop them into a bauble and create this awesome Christmas song bauble!
    img_2147
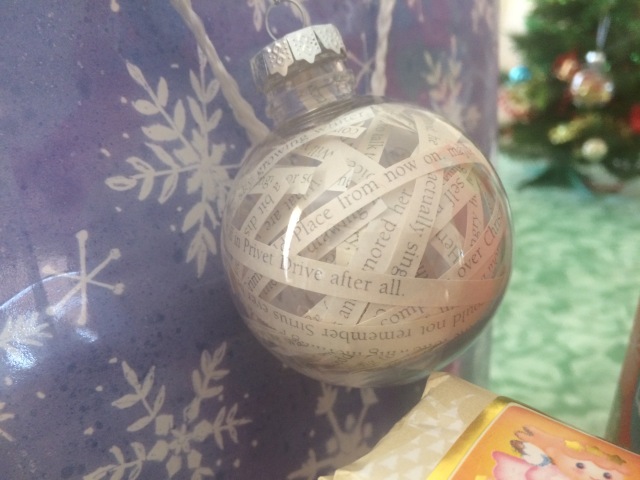
  7. Christmas Book Bauble
    Okay, this may be my second favourite bauble. It took forever though. But I did find a little helpful hack towards the end. Using a page of a book – I used a page from one of the Christmas related chapters in Harry Potter – slice the pages into lines and place into the bauble. I found that curling these lines slightly in the way that they needed to be helped put them in the right places in the bauble. I also needed to use two pages to create this look! But, it was worth it! I love it!
    img_2149

There you have it! My seven different DIY bauble designs! Add them to your Christmas tree, as decorations around you house or even to presents as another special gift!

I hope this gave you a bit of Christmas creativity! Christmas is just around the corner now!

Keep smiling,

Kay Anne

DIY Travel Pillow

Morning Beautifuls!

Hiya! How are you all? I hope you are having an absolutely amazing December so far and loving life! I have been having so much fun procrastinating and making things (as I may be in the Christmas gift-giving spirit!).

And I made a travel pillow!!!! I am about 150% happy with it – if you know me well, anything that includes a sewing machine leads to disasters (like accidentally sewing my sleeve to the material) but this project actually worked!!! So I needed to share it with you. If I can do it, anyone can! Plus is makes for an incredible travel-related Christmas present!

What you need:

  •  Stretchy material of your choice
  • This template
  • Sewing machine
  • Stuffing or filling beads

IMG_0940

Place the template on the edge of your folded material and cut it out (just not the end that is on the fold!). Cut it out with a stitching allowance of 1/2-1cm. Then cut another one out! In the end you need two that look like this:

IMG_0943_2

Pin them together (with right sides together and wrong sides out!) and then use the template and chalk in the template edges to follow when you start sewing. This was so much easier than guessing where the seam was and helped heaps at making the pillow symmetrical and everything!

Next you get to stitch around the pillow, leaving a 5-10cm gap in one side to stuff. I ended up stitching and overlocking it just to give it a bit more sturdiness so it doesn’t rip or break easily. Turn in out so the right sides are facing out:

IMG_0946_2

Then comes the fun bit – stuffing! I ended up using stuffing beads which was a bit of a fund experience – in other words, don’t spill them, they go everywhere!

By hand, once you have finished stuffing, stitch up the hole. This was probably the most tricky part but just remember to stay close to the edge and do it in a colour that is similar to your pillow!

Yay! Your very own travel pillow! Now all you have to do is go on a road trip or overseas adventure to use it.

Hmm… I wonder when that will be? 🙂

Keep smiling,

Kay Anne.

Cute Christmas DIY Ideas!

Morning Beautifuls,

Another Christmas filled present ideas for anyone out there who struggles finding Christmas presents for a handful (whether big or small) of people! I love the idea of giving homemade presents at Christmas as I feel it adds to the Christmas spirit, and, honestly, is just something I have grown up doing! So I thought I would share with you some of my favourite DIY projects that are simple, quick and incredible!

Lets get started!

1. Photo Coasters:
I found these glass coasters at Kmart for $6 and immediately thought of the endless possibilities they had as Christmas gifts! You would make festive coasters, using Christmassy pictures, add family or friend photos related to the person you are giving them to, or do what I did and add some cute quote photos into them! The sizing of the photos are given on the little card inside each coaster, making the printing and cropping of each picture super quick and extra easy!

IMG_0958_2

2. Lip Balm:
Again another cute homemade gift idea. I don’t know how I stumbled upon this DIY lipgloss but after I tried it out, I was pleasantly surprised with the final result! All you need is some petroleum jelly, a coloured lipstick or eyeshadow, glitter – if you want!-, and some essence (I used vanilla!). Mix all your ingredients together, adding as much colour to the jelly until you find your perfect colour and then put them into cute pots (that you can buy at the Two Dollar Shop!). Think of all the colours you could make! The best thing is that they work like lip stains, adding a pop of colour to your lips with a nice moisturising feel!

IMG_0962_2

3. Sharpie Decorated Mugs:
I saw this idea online and think it is the perfect christmas project. White mugs decorated with sharpies and then bake in a 180 degree Celcius oven for 30mins! Simple! And with all the coloured sharpies out there, imagine the fun you could have! My only slight warning is to make certain that the mugs are microwave/oven safe… I dare not think about what could happen if they aren’t!

4. Felt Hand Warmers:
I made a blog post on these and do think they would make an amazing stocking filler, especially for those countries that experience a bit of a chilly Christmas! I just think they are a super cute and fun gift idea.

IMG_0987_2

5. Paper Bows:
These make incredible present decorations and could even work as hair clips, especially if you substitute the paper for a nice material! There is a template for bigger bows here but if you google ‘paper bow template’ millions of different sizes pop up that you could use! I made a box full of them last year and love using them for an extra decoration (and for some cute, easy hair clips!). You could even get more creative and make them out of felt, or spritz them up with a bit of glitter!

6. Homemade Nutella:
I haven’t tried this one yet but it looks easy and, I mean, who doesn’t like Nutella! Homemade though? Wow!! Check out the recipe click here!

7. Photo Calendar:
I make this one every year for my mum – so much that it has become a tradition in our family! Honestly, its quite simple – download the new years calendar template in Microsoft Word, adding family birthdays and special days (if desired) and then have fun picking 12 pictures to go with each month! The hardest thing is to print the whole thing, but after a bit of practice – be prepared to get at least one upside down – you will have your own personalised calendar. You can hole punch it and add cute ties to hold it together or go a bit more full out and get it bounded!

8. Material Roll Holders:
I have no idea what to call these but they are amazing! You can make them for anyone and heaps of different things! My mum has a cotton material one for all her knitting needles, my dad has a ‘jeans’ material one for some of his tools (like screwdrivers and other bits and bobs) and my latest ones I’ve made are face towels converted into travel holders for my toothbrush and other bits and bobs! They are so simple to do and only need to know how to do straight lines on a sewing machine (which is pretty easy if I say so myself!). Just cut the material you chose out to the length you need, fold it over and sew little pockets for your appliances. Add a tie to one side and its complete. Simple!

IMG_1353_2

9. Glitter Snow Globes:
These are an incredible idea and I really wish I had one to show you! But I don’t. So, google them! For these, all you need it a glass container with a very good lid, some cute ornaments that you want in your snow globe, glue, glitter, water and glycerin. Glycerin changing the quickness the glitter (or ‘snow’) will fall, so you can leave it out or use corn syrup. Add depends on what you want! Now there are two different ways of putting these together – either you can glue your ornaments to the lid or the bottom of the container. Just glue the lid on very well or there could be a bit or a disaster!
Snow globes always make me feel Christmassy!!

10. DIY Bath Bombs:
These are the one of the easiest bath/beauty related things to make and can be so much fun! There are so many different recipes for DIY bath bombs on the internet and the amount of fun you can have with them is beyond explainable! Feel free to find your own recipe, but what I work with to make one to two bath bombs (or more depending how big you want them) usually follows this recipe: Mix 2 tablespoons baking soda with 1 tablespoon citric acid, 1 tablespoon cornstarch and 1 tablespoon epsom salts. Mix until not lumpy. While still mixing, add 1/4 teaspoon oil, 3/4 teaspoons essential oil of your own choice (or the scent that you would like your bath bomb to be) and one to two drops of food colouring. There should be a slight fizz from the citric acid but not too much or the bath bomb with be bombed out! The mixture should clump together (but still a little crumbly!) and turn the colour you dyed it. Then pack it into your mould and allow to dry for at least 5 hours before getting out of the mould and another 4 before adding them to the bath (or just leave them over night!). Cute, cute, cute!!

Extra Christmassy Gift Idea: Hot Chocolate Mix Ornaments!
I really wish (again) that I had another picture for this one because when I saw it online I just thought they were the cutest things in the world. I noticed a lot now that you can buy plastic/glass empty ornaments and fill them up so thought that this idea was to die for! It is a really cute, Christmassy way of displaying things on the Christmas tree and having a cute hot chocolate, with the different flavours perfect Christmas treats! Not sure what I am talking about? Take a look for yourself here!! Aren’t they cute?

Okay! I’m getting a bit too carried away with DIY Christmas suggestions! This is way too much fun for me and I think I might have to go run a bath with a new bath bomb to calm myself down!!

Keep smiling and stay Christmassy,

Kay Anne

5 Christmas Gifts in a Jar

Morning Beautifuls,

Its December now! I’m socially allowed to get exited for Christmas! Woohoo!!!

Which obviously means Christmas related blogs! Get ready for an onslaught of them up until Christmas – hopefully every Tuesday, Thursday and Sunday right up until Christmas Eve!!

I have to start off with this post – it only seems fitting! This one has to be one of my favourite blogs ever as I love the idea of gift in jars! They have to be the most amazing idea and can become such creative outlets. I’m so excited to share with you five of my favourite Jar Gifts that I have made!

Now, most of these will work with any sized jars – including finished jam jars! I think glass ones look better than plastic ones and love the ones with slight detail on them or the complete opposite – very plain ones that I can decorate. Just, with both of the baking ones, you may need to tweak the ratios of the ingredients depending on the sizes of the containers. I would recommend a 1 litre container or a half a litre container, but any size works – there just may be a bit of maths included!

But lets get one with the awesome ideas!!! Woohoo!!

IMG_1333

(I don’t know where to start!)

IMG_1340_2

The first one I want to start with is Triple Chocolate Chip Cookies in a Jar. I tweaked this from a few different recipes, so fingers crossed it’ll work out. I’m quietly confident though – I mean you can’t go wrong with chocolate, right? For this one, I had to half the ingredients for it to fit into the jar I picked. However, for the sake of this blog post, I’ll give you the 1L equivalent.

So, all you need to do is layer the ingredients in the following order:

  • 1 3/4 cups plain flour mixed with 1tsp baking powder and 1tsp baking soda
  • 3/4 cup brown sugar
  • 1/2 cup white sugar
  • 1/4 cup cocoa
  • However much is necessary to fill your container of milk, dark and white chocolate.

I found funnel and spoon extremely helpful in getting all the ingredients in the jar, although if you’re a bit more skilled than I am, measuring jugs could work just as well.

In a tag, attach the following instructions:

Preheat oven to 180 degrees Celsius. Empty cookie mix into a large bowl.
Mix with 3/4 cup softened butter, 1 egg and 1 tsp of vanilla essence.
Shape into balls and cook for 11-13 minutes.
Enjoy with a Merry Christmas!

Woohoo!! First jar done! Lets move onto the next one!

IMG_1337

The second baking related jar I made was a Apple Crumble Mix Jar. I think this is a gorgeous Christmas-themed present and it makes a perfect apple crumble! Ugh, my mouth is watering just thinking about it!

What you need to layer:

  • 1/2 cup flour
  • 2/3 cup brown sugar
  • 1 cup oats
  • 1/2 cup flour
  • 2/3 cup brown sugar
  • 1/4 cup oats
  • 2 tsp cinnamon and 2tsp nutmeg.

You can put both sugars and flour together to make thicker layers but I really loved it with the thinner layers. I also had a bit of room at the top of mine – I forgot to check what size the container was before starting – but plan to add some dried fruits – maybe cranberries or sultanas closer to giving it away. I think this would add a lovely christmassy feel and give the apple crumble a different, brighter flavour!

Anyway, for the label:

Preheat oven to 180 degree Celsius.
Peel and slice 4-8 apples and lay them in a baking dish.
Pour contents of jar into a bowl. Mix 1/3 cup of butter and mix until crumbly.
Sprinkle over top of apples and cook for 30mins.
Enjoy warm with ice cream or cream and a Happy Christmas!

IMG_1344

Moving on to other types of jars! The third idea is still baking related but doesn’t include the use of any ingredients (or anything that can make a absolute mess!). All you need for this one is some baking supplies and a cute tin and you are good to go!

What I put in mine are just some suggestions as there are limitless things you could place in this depending on the size and shape of your jar and who you were given it to. It took me a while to figure out this jars contents but in the end I decided with:

  • A variety of Christmas Cupcake Cases
  • Two Christmassy themed cookie cutters
  • Glitter icing pens/tubes

As a stocking filler or a cute baking utilities present, this is a super great idea for that chef in your family who knows every recipe! Plus, if you look around in some of the stores, you would be surprised at the fun little kitchen gadgets you can find. Like Strawberry top removers!

IMG_1346_2

The next jar is a manicure/pedicure set and is a super quick and cute idea with heaps of different things to place and display inside!

Keeping mine slightly simple but still Christmassy and cute, I decided to place into mine:

  • Mint scented bath/feet scrub crystals
  • Mint scented nail polish remover
  • A pair of nail clippers
  • A cute peach scented tea light (side note: peach scented things smell amazing!)
  • Sparkly red nail polish (you could go for any colour but I thought red sparkles just screamed Christmas!)

After placing them inside, and finally finding another use of my ability to use chopsticks, I then covered the tin lid with a cute red and white polka dotted material cut into a circle. To this I attached a nail file in the shape of a star which I thought really added to the Christmas feel and still encompassing with the theme.

IMG_1342_2

Final jar is more of a sentimental jar that I really wanted to make for one of my friends. She is really into quotes and when I had this idea I couldn’t believe I hadn’t thought of it earlier – like six years ago. Funnily enough, this jar took the longest for me to make – searching the internet for suitable quotes, collaborating them, printing them out and putting them all in the jar took longer than I expected. After adding a bit of wasabi tape for decorating and using silver glitter letters to write ‘A Jar Of Quotes’, the jar was finally finished.

I am in love with the final result. I was hoping to add 200ish quotes into the jar but they didn’t all fit – which shows my lack of spatial awareness. You could do 52 quotes – one for each week of the year – or even 365 – one for each day of the year – or, like me, just add as many as your jar will hold. I have to admit, I am the most proud of this jar.

IMG_1335

Anyway! I really hope you enjoyed this blog and it gave you some inspiration for Christmas gifts! I really think they are an incredible idea and love using them at Christmas time. Some can even work for birthdays!!

Keep smiling and get excited for Christmas!!

Kay Anne

DIY Heart Hand Warmers

Morning Beautifuls,

Hey you! Feeling bored? Creative? Want something exciting to do?

Well, here is a DIY project for you to try! This one takes about 10-15mins, depending on your craft skills and is a super awesome idea for a Christmas gift! (hint hint!). I really think they are cute ideas for the winter months and a perfect size for jacket pockets to keep your hands warm on those chilly days!

So, what you will need:

  • 15x20com sheet of felt in whatever colour you would like (I ended up making an orange, light pink and dark pink although I only photographed my dark pink one)
  • Thread either in a contrasting colour or in the same colour as your felt (I used orange for my pinks and dark pink for my orange)
  • A needle
  • Rice

Start by folding your felt in half portrait-ways. Draw a heart shape onto your felt. I recommend having the fold at the point of the heart. Cut it out and then you get to start to stitch around the sides.

IMG_0985

Once you have a gap of about 4cm in the side, knot the stitch and fill your heart with rice. You need just enough to make it puffy but not too much that you can’t stitch the sides up!Once its filled with the amount you want, finish stitching it up!

IMG_0987_2

Perfect! Completed! Now all you have to do is heat it up in the microwave for around 20-30secs and you have your own personal heart hand warmer! Can’t wait to use them (or, you know, give them away as Christmas gifts!).

Keep smiling,

Kay Anne.

Arts and Craft: Shoe Bows

Morning Beautifuls,

A while ago, my friend gave me some cute little kits for  DIY shoe bows.

The other day, I got bored.

Which is a perfect excuse to get inspired and make cute shoe bows! Obviously, which leads me wanting to show you how because they are just so cute!

What you need:

  • 8 10x10cm squares of sheer net material (in whatever colour you like)
  • thread in a very similar colour of the material you chose
  • 2 small metal clips
  • 2 sewing crystals (preferably 1-1.5cm in length)
  • A threading needle with a decent size eye (because threading thread into the needle eye is hell)

DSC04752

The first thing you need to do is pick up four of your sheer squares and line them up nicely. Using your thread, stitch a running thread down the middle of the squares.

Once complete, pull tightly until they bunch together in the shape of a bow. You don’t have to cut the thread off, just flip it to the side you would like on the front, position the crystal where you would like it an stitch in on with stitches coming from the back. I don’t know how to explain this bit – all I did was stitch until it stuck. My first attempt was terrible but it slowly improved.

DSC04754DSC04755

Flip over and stitch the clip onto the back. Keep stitching until the clip tabs (on the side) are full with thread and don’t move.

DSC04756

Repeat to make a second one (or however many you like).

DSC04759 DSC04758

By the end, I was making them in around 15-20 minutes, making them super easy to make. Plus they look really cute! Better yet, substitute the clips for hair ties or hair pins and you have some super cute bows! I love the way that they use a few squares of material to create the bow as it makes it look puffier and prettier than just one square.

Love them both in the ease and final product! Yay!

Keep smiling,

Kay Anne.

Some Cute Easter Ideas

Morning Beautifuls,

There is a line of people outside the library and I don’t know if its an April Fools joke or a picket line and now I’m too scared to go into the library so I’m sitting outside, soaking in the Vitamin D (that is from the sun right?) trying my hardest to find the best place for the patchy internet.

Welcome to my Wednesday.

Now I should be doing assignments but break is next week and I feel I can procrastinate until then so instead I am putting all my remaining energy into this post.

Because Easter is in four days. FOUR DAYS! Which is slightly exciting as it means holidays and family and friends and fun – which is alway enjoyable at this time of the year.

Now, I love the crafty side that seems to come with Easter – sometimes I feel it is the only time of the year where you can muck around with chocolate eggs and bright colours and not be questioned on your actions. Because of this fact I feel it is only appropriate for me to share with you some of the Easter creativities I have made/procrastinated with this Easter.

So here are six ideas for you to try this Easter!

One: Felt Bunny Baskets

I got these little kits from a friend last Easter, forgot to make them then and happened to stumble upon them this Easter – to my surprise. These are really easy to make – one took me about half and hour – and look really adorable with the face and the ears and the cute little ribbon! I know, my felt was already cut out for me, however they don’t look that difficult to cut out from scratch – it is just a square with ears, right? Even the materials are basic: cotton, black beads and two patches of felt. Oh, and a ribbon. Most craft stores should have them and just imagine how many you could make with a bulk amount!! DSC04266 DSC04267 DSC04268

Two: Chocolate Foil Animals

I can’t get over how CUTE these look! Again, these were a gift and I was bouncing off my seat when I realised Easter would be the PERFECT time to see how they work. This idea is a bit more fiddly than most of the others, just because I wanted to make the chocolates myself, however would work perfectly with bought eggs as well.

I used a fondue set to melt the chocolate as it keeps it nice and slow, making it more difficult to burn the chocolate. Believe me, I have done that more times than I dare admit. The only issue with this way of melting the chocolate is that you don’t want to over stir it.

Spoon it into the moulds – yes, I get more chocolate outside the moulds than inside the moulds -, leave it overnight, and the next day you can wrap them up in the cute foils. I put two strawberries moulds together as I thought they were really cute and was the closest I could get to circles. Add the face, tails and legs and – Tada! – CUTE ANIMAL CHOCOLATES!

DSC04279DSC04277

Three: Heart Choco-Pops

Okay, so the only reason I made these was I had leftover chocolate from the mould above. These happened to be in the cupboard and, after mixing them with a bit of white chocolate I poured them into the the moulds adding the sticks into them.  The mini plastic bags were a cool way of displaying them  as you can see the swirling patterns of the chocolate and still hold them by the sticks!

DSC04280 DSC04282

Four: Easter Napkins

RABBIT NAPKINS! A cute origami way of folding napkins over easter, and yes, they are easy. I can’t do too much origami myself, but these looked too cute to not try. Although they work a lot better with a material napkins, they still work well with paper ones of different sizes. I mean, look at their ears and tails.

For a picture tutorial, just click here!

DSC04283 DSC04285

Five: A Bunny Picture

Want to send a cute Easter letter? Or just jazz up your house a little for Easter? Here is a simple image idea and all you need is an old newspaper and a cotton bud. Just cut out the following shapes from the newspaper and glue them onto a card and you have a super duper cute bunny rabbit with an fluffy tail!

DSC04311 DSC04312 DSC04313

 Six: Easter Nails

One final Easter idea I wanted to share with you are some Easter-themed nail arts. These are just some cute, bright pink-and-blue nails with an awesome slash of glitter overtop! Don’t know how to explain them, so I will just show them to you!

DSC04294 DSC04301 DSC04310


Hope you enjoyed this ideas and Easter is an exciting but relaxing time for you all!

Just remember what the true meaning of Easter is though 🙂

Keep smiling and Happy Easter,

Kay Anne.


My Adventures with Nail Polish: Bright Patterning

Morning Beautifuls,

I put up a post a while back about my top five nail polishes (give you permission to check it out here!). I have had a bit of fun recently procrastinating and painting my nails so decided to raid my collection and see how creative (and slightly extreme) I could get.

Well, This happened.

DSC02703

As you can see, each finger nail has a different design made up of three colours – pink, purple and black. If I recall correctly, this pink is actually in my top five post. These were then mirrored on my other hand.

Fancy knowing how to do it?

I would love to say that it isn’t that hard, but apparently I’m pretty decent at doing my own nails (Which I strongly disagree with). But I’ll let you all try and decide.

DSC02678

All you need is three of your favourite nail polishes, a clear varnish, cotton balls, nail polish remover and some sort of sticky tape (or name tag tape). You can see in the picture what I used.

The first step is to place the sticky paper over the areas where your darkest two colours are going. For me, I decided my pink shade was probably the lightest, so added the tape where the black would go and then where the purple would go. I did it in this order so I could remove the purple tape without having to remove the black ones as well (make sense?).

DSC02679

Then you get to paint your nails! Paint your first colour, let it dry, remove the tape where the second colour would go, pain, dry, remove, paint, dry. Any mistakes can just be removed by a cotton swab dipped in a bit of remover. Once they are done and dry add the clear varnish on top to give them extra strength and make them that tiny bit shinier.

Simple.

DSC02700 DSC02699

I have to admit the most time-consuming bit was waiting for each colour to dry. For me, I managed to work on my assignments during this time, making it the perfect system!

Anyway, have heaps of fun creating your own crazy, bright nails!

Keep smiling,

Kay Anne.

Father’s Day Gift Ideas


Morning Beautifuls,

Father’s Day is coming up this weekend and I always find it much more difficult to buy presents for this day than it is for Mother’s Day. I end up asking my mother what he would like and going shopping with her for something useful and ‘present-y’.

Yup, I am that bad.

On that note, I thought I would share with you all some of the previous gifts I have bought/made my father in the hopes that the creative juices with give me an idea of what to do this year.

  1. Ugg Boots (or Slippers) – These were last year’s Father’s Day presents, and I feel were the best gift yet. I was a bit uncertain when I first purchased these as a gift that they were just going to be one of those things that stay in the closet, but was pleasantly surprised when they were worn nearly every singly day of winter. Due to that, they are becoming a ‘favourite’ for when buying presents (so much so that we bought one for my grandfather this year!).
  2. Clothes – Does your Dad have a worn shirt/tie/pants that he wears nearly every day? Replace that for Father’s Day. Go out, take your time and try to pick a very similar shirt for him. Just be prepared for it to become in a similar state in a few years time. At least you have a gift idea then to replace it with!
  3. Bunning’s Gift Voucher – I honestly think my father lives at this shop. No joke, I think he goes there at every Saturday at the least. Okay, it doesn’t have to be Bunnings, but find your Dad’s favourite shop and buy him a gift voucher for it. The money will be well spent (and it is a perfect gift if you left the buying to the last minute!)
  4. Homemade Card – This is a sweet, creative way of giving your father a good gift, especially if he says he ‘doesn’t want anything’. I have two suggestions on types of cards you can give him, that can be quick and really cool designs:
    1. Father’s Day Tie Card
    2. Bow Tie Father’s Day Card

DSC02456

  1. Food/Snacks/Lollies – buy a ‘Dad’s Lolly Jar’ lolly jar, stuff it with your Dad’s favourites lollies and sweets. Not only do you get him his own personal lolly jar, you feed him and food will make him happy. Goal achieved.
  2. Make him breakfast! – Find his favourite breakfast meal and make it for him. Few suggestions for you include:
    • Pancakes (don’t forget the icecream or cream and fresh fruit!)
    • Eggs and bacon (feel free to include sausages and muffin rolls)
    • Spaghetti, baked beans and scrambled eggs

These are just a few suggestions (and I still have no idea what to buy my father!). Hope they helped get the creative juices of your brain moving and I wish all the fathers an incredible Father’s Day!

Keep smiling,

Kay Anne.

DIY Birthday Party (Part One)

Morning Beautifuls!

Everyone has a birthday and mine just happens to be coming up in just over a month (which came as a sudden shock to myself).

This year happens to be my 21st so it seems to be the social norm to have a birthday party/gathering/whatever-you-want-to-call-it. Truth be told, I love organising events. Food, decorations, guest list, invites, everything! Planning these things is just something I love to do.However, I’m not that fond of late-nights and crazy parties. At all. So, after weeks of deliberation, I decided to add a twist to my 21st by having it not only during the day but also theming it as a carnival.

Yes, you read the correctly. Carnival. Face-painting, game booths, junk food – all those crazy, awesome things.

Obviously, my next crazy thought was something along the lines of “Hey!, lets take you along on my journey of the preparations”. So here it goes!


I guess the first thing to start with are the invitations.

I love the idea of getting invites by post so I decided to post most of the invites (well, the ones for those that I had addresses for). I was a bit bored when I decided to do the invites for my birthday so they were all different.

All of them.

But a few of the ones I made included black and white striped paper, in a style similar to that seen below:

DSC02363

I thought these were really cool as they reminded me of the carnival style and came in a pack from Kmart for around $20. The paper also feels really funky. Extra points to that!

I also did a few online invites for those some others (mainly family members). For this I used www.punhbowl.com which is a free website for making invites and thankyou letters. It took me ages to decide which website to use (I mean there are THOUSANDS of online invitation websites out there) but I decided to use Punchbowl because it had really cool designs for free and was really easy to follow and use. Plus it actually put the invite in the envelope for the recipient to virtually open, which was so fun to do!

So that is my invites, I’ll be sure to keep you posted on any other crazy ideas and preparation tasks I do before the day actually arrives!

Keep smiling,

Kay Anne.