7 DIY Christmas Baubles

Morning Beautifuls,

I’ve been in a creative mood this week on my days off, getting the Christmas spirit through Christmas DIYs.

One of my favourite so far that I wanted to share with you a DIY decorative Baubles. Well, 7 different baubles DIYs you can do with those clear, plastic (or glass!) baubles you usually see at craft shops at this time of year.

I managed to grab a pack of 9 plastic baubles from Lincraft for about $3.00 – bargain!
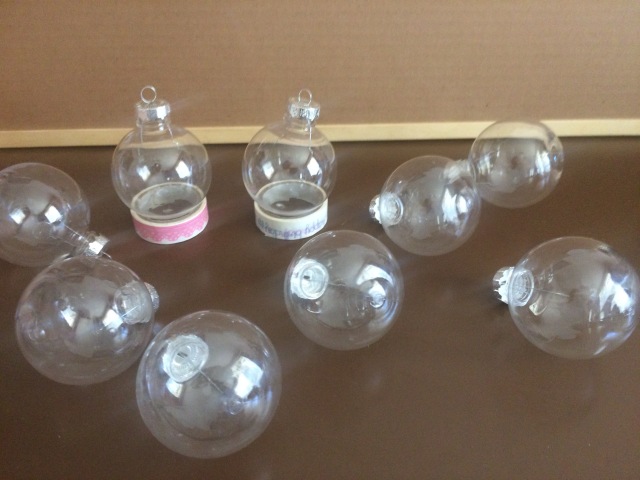
img_2115

Then it was time  to get creative!

  1. Dip-dyed Christmas bauble
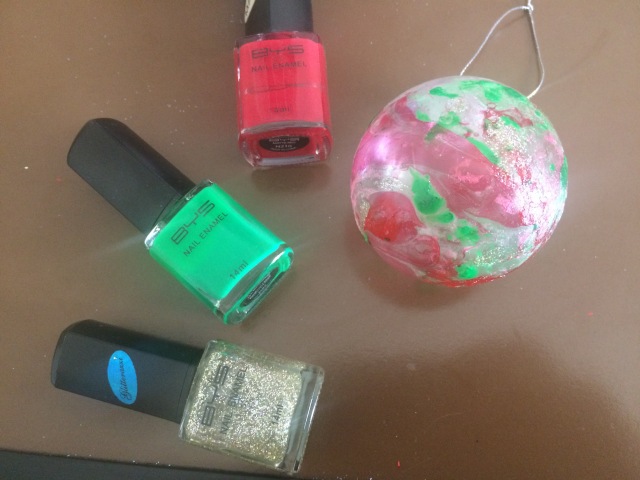
    All you need for this bauble is a bowl of water and your favourite Christmas coloured nail polished. Pour some of your nail colour into your bowl of water and then dip you bauble into the water and swirl it around. The nail polish will stick to the bauble in a colourful design!
    img_2140
  2. Glitter filled baubles
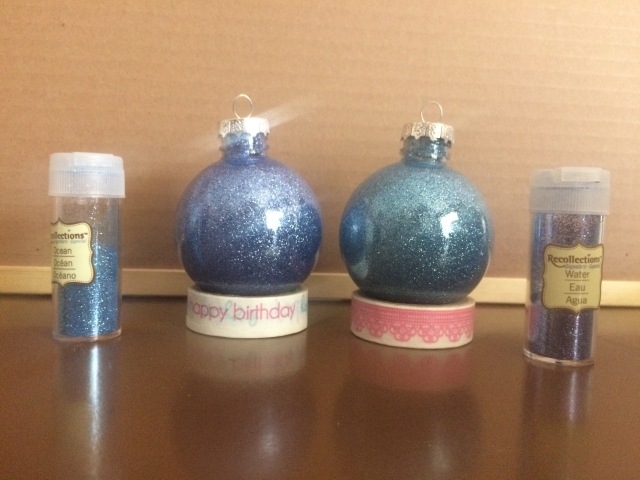
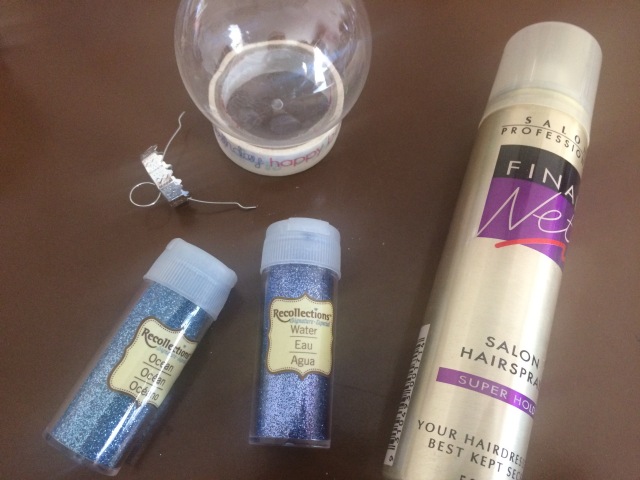
    This was probably may favourite bauble design – hence why I ended up making two instead of one! Firstly, spray the inside of the bauble with hairspray – or some static stick spray (say that ten times fast!) – and then pour a generous amount of your favourite colour glitter into the bauble. Place your finger over the opening and shake it around until the inside is all coated! I really love the final product of this – sparkly and pretty baubles! My camera, not so much! It kept having a bit of a panic over the glitter intensity!
    img_2117
    img_2121
  3. Swirling Nail Polish Bauble
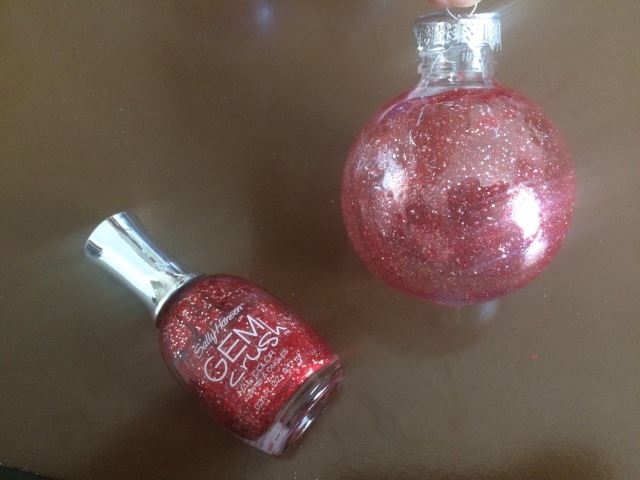
    Another simple bauble design! Pour your favourite colour nail polish into a bauble and swirl it around to create a marbled effect within the bauble. I found that adding reds and glitters created an awesome swirl inside the bauble.
    img_2138
  4. Ribbon Curls Bauble
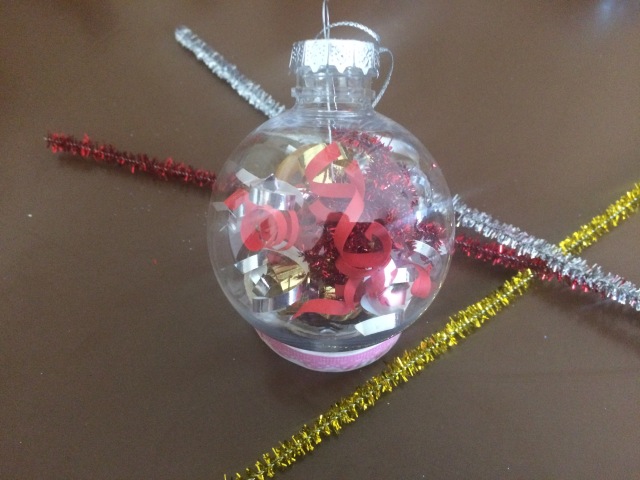
    You know all those off cuts of ribbon and tinsel that you never know what to do? Well, curl them into swirls and pop them into a bauble. You’ll be surprise how quick they will turn into awesome Christmas decorations!
    img_2143
  5. A Rose Garden Bauble
    Create a cute little Christmas garden in a bauble. This one was a bit more fiddly than the others but I really love the final, sophisticated bauble that I ended up with. Using some plastic flowers and leaves, pop them into a bauble and then use a pen – or something similar – to move them around until you are happy with their placement! Ta-da! Cute Christmas Garden bauble.
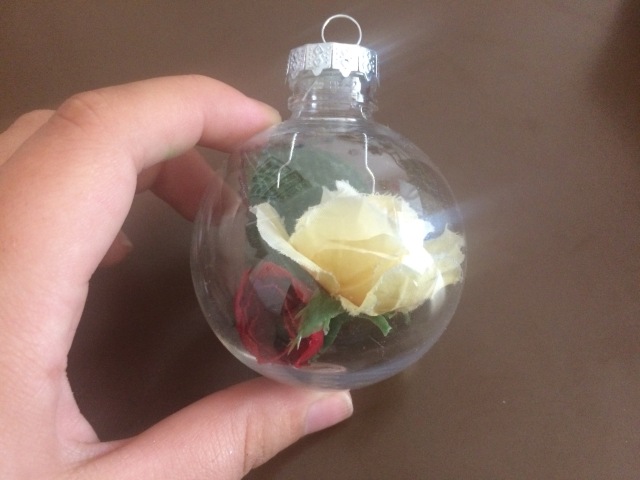
    img_2125
  6. Christmas Song Bauble
    This was a little bit of fun and turned out incredible! All you need is a page of music – or, if like me you didn’t want to chop up a lovely page of music, photocopy! – and a pen/pencil/something that you can curl paper around. Cut the music into strips and wrap around a pen (or similar) to create a cute little curl! Pop them into a bauble and create this awesome Christmas song bauble!
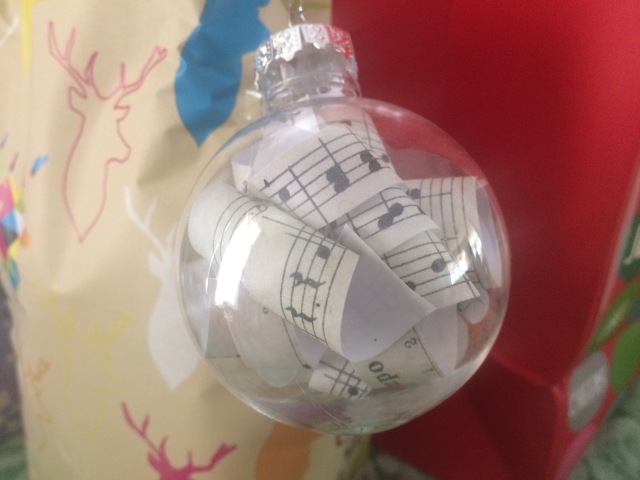
    img_2147
  7. Christmas Book Bauble
    Okay, this may be my second favourite bauble. It took forever though. But I did find a little helpful hack towards the end. Using a page of a book – I used a page from one of the Christmas related chapters in Harry Potter – slice the pages into lines and place into the bauble. I found that curling these lines slightly in the way that they needed to be helped put them in the right places in the bauble. I also needed to use two pages to create this look! But, it was worth it! I love it!
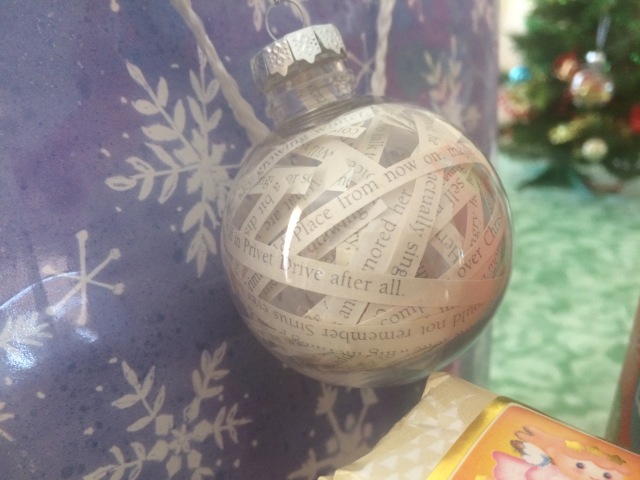
    img_2149

There you have it! My seven different DIY bauble designs! Add them to your Christmas tree, as decorations around you house or even to presents as another special gift!

I hope this gave you a bit of Christmas creativity! Christmas is just around the corner now!

Keep smiling,

Kay Anne

Christmas Morning Routine + Makeup Look!

Morning Beautifuls,

Three more sleeps until Christmas!

If you have anyone in your household under the age of thirteen (or anyone really who just gets super excited for Christmas), you are probably having to prepare yourself for a very, very early morning wakeup on the big day. Which for me means a busy morning followed by an afternoon of lounging around and watching TV. Classic Christmas!

However, as the morning is busy, I find it difficult to do a complete cleanse and makeup look in order to feel awake for the whole day. So today I really wanted to share with you my super quick, super easy morning routine on Christmas day.

DSC05205

The first thing I always do in the morning once I have woken up is wash my face. I have read studies that recommend never washing your  face with warm to hot water because it can dry out the skin but, lets be real, when it is the middle of winter and freezing cold, sometimes that is hard! I try to always use cold water or lukewarm water and pat my face and neck clean with a damp face towel.

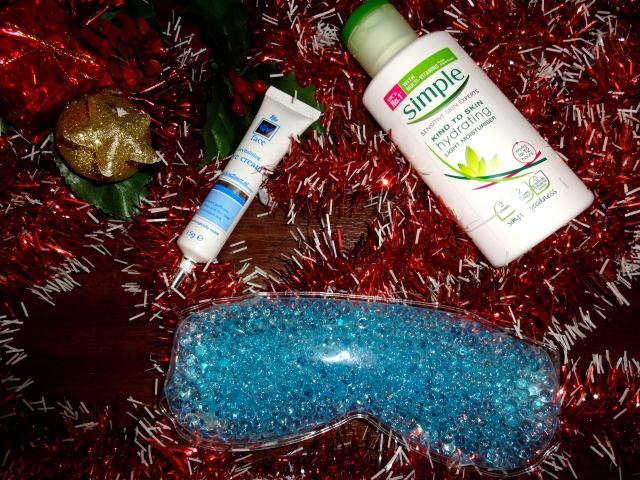
On early mornings, when I have time, I occasionally apply a cold eye mask to my eyes for around 2-5mins in 20 second intervals. This is perfect in reducing puffiness and dark circles around my eyes and leaves me feeling more awake (which makes it great for Christmas day!). Next I apply my moisturiser. Previously, I have been using Neutrogena moisturiser but the other day I stumbled across Simple’s Hydrating Light Moisturiser which I have fallen in love with. I have super sensitive skin and it is the first ever moisturiser I have been able to wear every day, seven days a week. However, I do find it slightly different to most other moisturisers I have used as it leaves a ‘wet’ feeling for a few minutes after its application. However, once it dries and soaks in, you can’t even feel it! Under my eyes I like using my QV Revitalising Eye Cream. This is amazing at reducing dark circles and that look of sleep deprivation.

As we do presents in the morning on Christmas Day, this would probably be everything I do before heading out to have breakfast and engage in all the festiveness! Once all the family morning is over, and just before we have people over or head out, I throw on a very simple and quick makeup look.

DSC05197

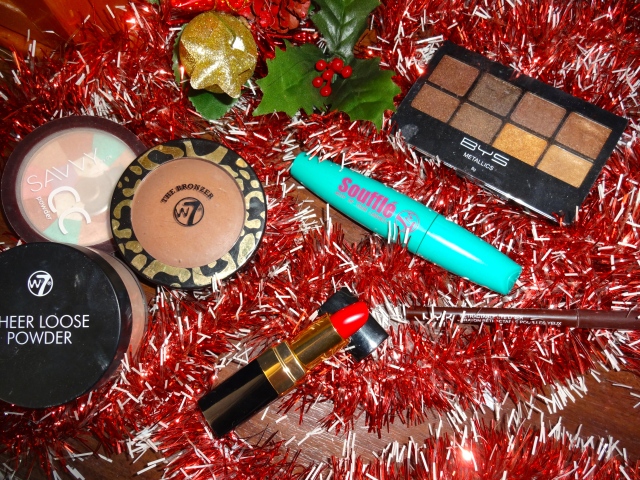
Using just a tad of foundation powder (my trusty W7 Sheer Loose Powder) and then brushing on by Savvy Colour Correctional Powder and W7 Bronzer (if necessary), I then focus on my eyes. Keeping it simple, I love dusting my eyelids with a gold shimmer eyeshadow before lining my eyes in a brown pencil and brushing my lashed with a bit of mascara. Any gold colour would do, but for a cheap option BYS Metallics pallet has a perfect gold shimmer in both a lighter and darker shade (I love the darker one!). And then, as it is Christmas, a red lip is definitely in order!

DSC05203

I love the gold, brown and red tones together as they give a lovely warm Christmas glow. I find that with a red lip, keeping all the other makeup natural gives for a perfect complexion and look.

DSC05207

Throw on some festive earrings and jewellery and your Christmas outfit (because lets be real, at Christmas you never get out of your PJ’s until it is extremely necessary!) and you are ready to go!

Keep smiling and have a holly, jolly Christmas!

🎄 🕵Kay Anne  🎄

Bake With Me: Mince Pies!

Morning Beautifuls,

What screams Christmas more than mince pies? (Hint: nothing).

As I’ve being trying out so many new recipes throughout this holiday season, I decided to have a try at making some Christmas mince pies. I don’t actually like the taste of mince pies, although all the rest of my family loves them. I do love the smell of them though. The cinnamon and mixed spices make the house smell incredible, especially as they are cooking!

So let us make the whole house smell of Christmas and get baking!

You will need:

  • 750g mixed dried fruit
  • 100g blanched/flaked almonds
  • 1 1/2 cups brown sugar
  • juice and rind of 1 small lemon
  • juice and rind of 1 small orange
  • 1 1/2 tsp mixed spice
  • 1/2 tsp ground nutmeg
  • 100g butter, melted
  • 1 cup brandy (or 1 cup water)
  • 1 packet frozen shortcrust pastry
  • Milk, to brush pastry

The first step is the longest step in the world. Just going to mention that. You need to chop all the fruit into small pieces and add the almonds, brown sugar, rind and juices, spices, butter and brandy to it, mixing well. Then you get to cover the bowl in cling wrap and refrigerate it for a while. This can be overnight or for a week (stirring at least once each day). I ended up leaving for a week (As I got super busy and forgot to make them earlier!). But whatever you choose!

Next comes the fun bit! Heat your oven to 180 degrees Celsius and start rolling out your pastry. I bought pre cut pastry, making it not necessary for me to do any rolling. Which was great, because I struggle to evenly roll pastry.

Using a fluted cutter, that is slightly bigger than your pie pan (or cupcake tin) circle, cut the bases of your mince pies. Press then into your pan and then fill the bases with the mixture. Once that is done, brush the pastry edges with a bit of milk. This creates a glue in order to hold the tops on.

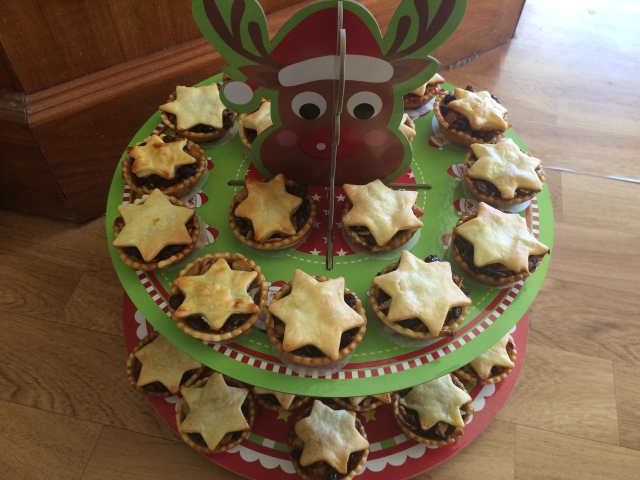
For the lid: You can either use a smaller circle to create the lids for your mince pies or, as I decided to do, use cute star cutouts to have an awesome extra-Christmassy lid. Just make sure the stars are big enough to touch the sides of the pastry or they could fall off!

Bake it for 15-18mins until they are lightly browned, sprinkle with some icing sugar and enjoy!

IMG_4046 IMG_4048

I’ve been told that these mince pies taste amazing either by themselves or with a splash of custard (you could even try eggnog seeming it is Christmas!) and ended up being really easy (and fun!) to do. It does make A LOT so enjoy giving them away as Christmas gifts (Christmas cupcake boxes are awesome to store them and wrap your mince pies) or have heaps of fun munching on them all!!!

Keep smiling and enjoy all the Christmas goodies,

Kay Anne.

Bake With Me: Chocolate Log

Morning Beautifuls,

More Christmas food! Woohoo! This is another fun no-bake recipe for a Chocolate ‘Yule Log’ – something that has been a traditional dessert at our family Christmas days, however I have never made one.

Until today.

Now I have no idea why I haven’t made one before because it is so easy and made me feel even more in the Christmas spirit. Well, if that is even possible!

So lets relive my baking experience and I’ll show you how they are done!

You will need:

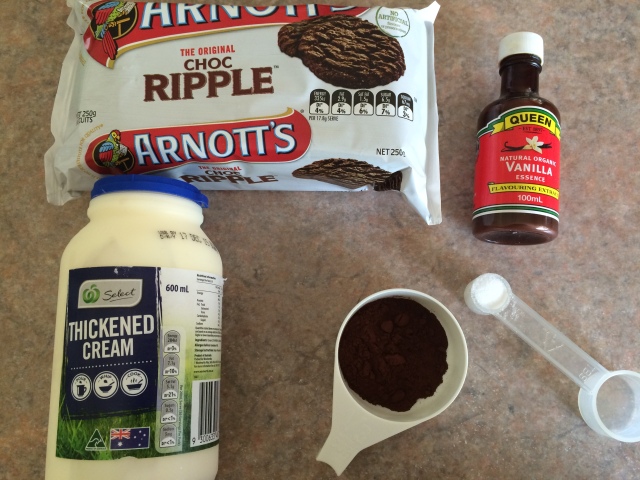
  • 1 packet of Arnott’s Chocolate Ripple biscuits (These are the best cookies to use for this recipe, however you could use any chocolate biscuit)
  • 600ml thickened cream
  • 1 tsp caster sugar
  • 1 tsp vanilla essence
  • 20g cocoa powder
  • Grated chocolate, to decorate

IMG_2411

Using an electric mixer, whip cream together with sugar and vanilla essence until stiff. You need it to hold shape and not go all smooshy and droopy when spread. Fold in cocoa powder (or chuck it in and then give it a cheeky zap with the electric mixer to mix it in super quickly. Just don’t over whip and create butter!).

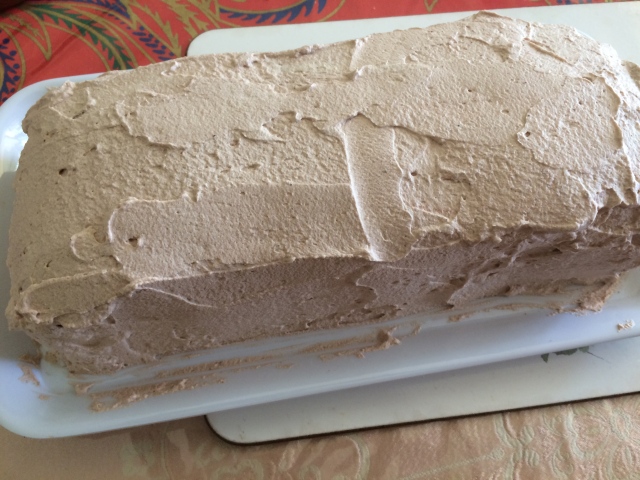
Now comes for the fun bit which isn’t as difficult as I thought it would be. Spread some cream onto your serving tray to create a sticky base to hold your biscuits up. Then spread cream onto the smooth edge of your biscuit, stick it to another one and press them vertically into the cream base. Keep going until you have created your desired shape. Then you get to coat the whole thing in the rest of the cream so you can’t see any of the biscuits!

IMG_2413

Cover very, very loosely in cling wrap or aluminium foil and refrigerate for at least 6 hours to let it set slightly.

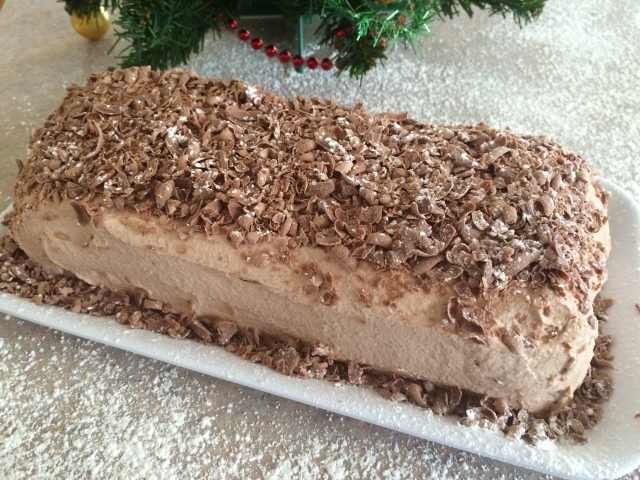
Before you serve it come the fun part. Using a fork create some scrapes into the cream to create a lined pattern and sprinkle with a bit of icing sugar and grated chocolate. You can have heaps of fun at this stage – let your creativity show!

You can create a winter wonderland on top, adding a few sugar trees and some sugar figurines sledding or even just add a few holly twigs made out of candy spearmint leaves and raspberries.

Or keep it simple and elegant, probably how I will leave it! Lets be honest, it’ll probably be all consumed in an hour or so!

IMG_2423

Keep festively smiling,

Kay Anne
Bake With Me: No Ginger ‘Gingerbread’

Morning Beautifuls,

For today’s Christmas-related blog post, I really want to share with you my no ginger ‘gingerbread’ cookies.

Now, I don’t eat ginger but I love gingerbread, so this recipe was something I adapted so still have a slight ‘gingerbread’ feel to it without having any ginger in it.

For this recipe, you will need:

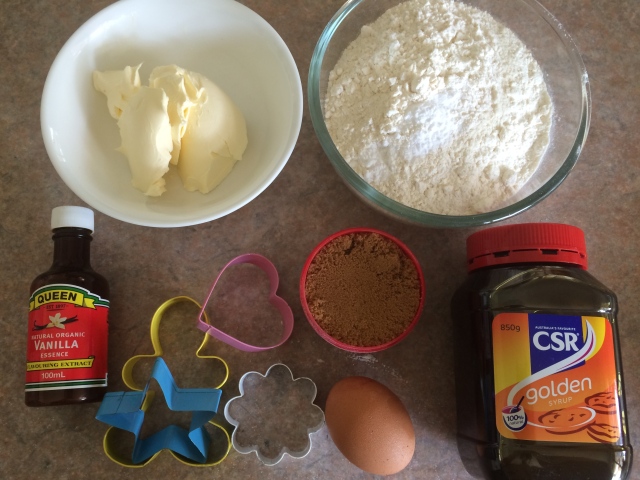
  • 125g butter, at room temperature
  • 1/2 cup brown sugar
  • 1/2 cup golden syrup
  • 1 egg
  • 2 1/2 plain flour
  • 1 tsp bicarbonate of soda
  • 1/8 tsp vanilla essence (optional)
  • Flour, for dusting
  • Icing, to decorate

IMG_1326

First thing to do it to mix the butter with the sugar until light and fluffy. Add the egg and golden syrup and vanilla. Stir until well mixed. Add the flour and mix until a dough is formed.

Cover in cling wrap and leave in the fridge for 30 minutes. This step is a must – I took it out after 10 and it didn’t work so I emphasise the fact that it NEEDS to go in the fridge for 30 mins. Put a timer on, read a book. Do something! Just don’t get it out early.

Then comes the fun part!

Rolling and cutting! Some recipes have a thickness guide – which I usually ignore. My guide is just not to make them too thick or too thin. And then pick your favourite cookie cutter and start cutting!

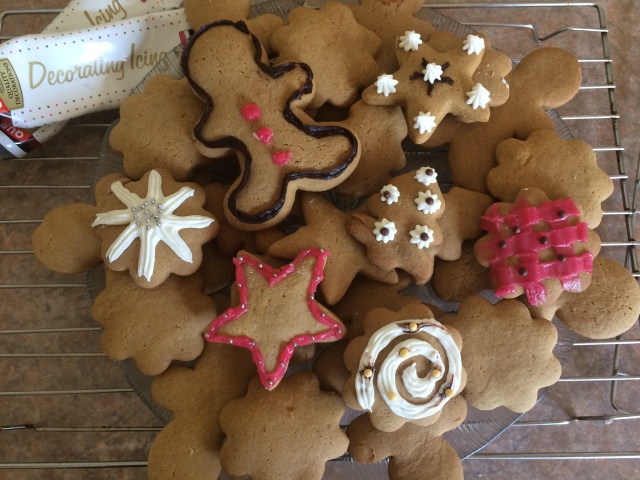
I decided to go for a traditional gingerbread man, a christmas tree, a star and a weird cloud shape that I was hoping I could tweak into a snowflake with icing.

Pop them in the oven for 11-13mins until golden brown! Leave to cook before decorating and eating!!

IMG_1330_2

Yum, yum, yum!! I love these cookies – I could eat them everyday! They are some of my favourite Christmas cookies ever!!

Keep smiling,

Kay Anne.

Bake With Me: Truffle Snowmen

Morning Beautifuls,

You’re going to hear this a lot this month – but I absolutely love this blog post! Edible Truffle Snowmen!!! These were super fun to make and looked super cute (so much so that I don’t want to eat one anymore… oops!). They are an extremely awesome hands-on and quite simple to do, well, depending on the decorations you choose to do. My hands will now probably smell all season of chocolate, sweets and coconut – not that I’m complaining!

How to make them though!

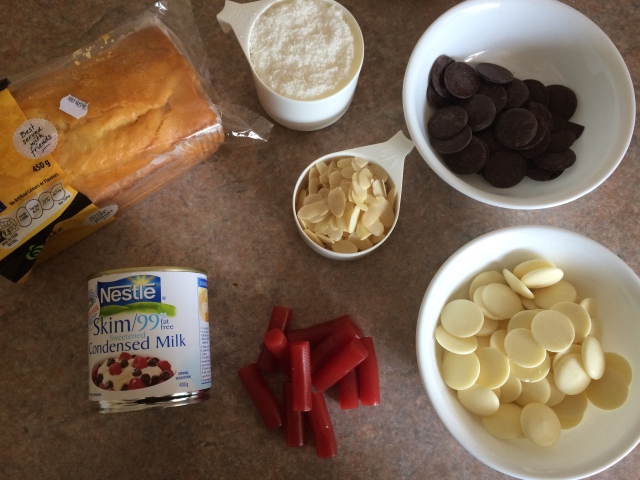
What you need:

  • 200g white chocolate melts
  • 1/4 cup sweetened condensed milk
  • 2 cup cake crumbs (for this I just bought a vanilla cake and crushed it into crumbs)
  • 1/4 cup slivered almonds, finely chopped
  • 1 cup desiccated coconut
  • 50-100g dark chocolate, to decorate
  • Strawberry Liquorice (or something similar), to decorate

IMG_2406

First things first, mix the white chocolate and condensed milk in a saucepan on super low heat until the chocolate is melted. Take it off the heat and stir in cake crumbs and almonds. The chill for around 1 hour until the dough is firm (but still slightly sticky).

Then comes the fun bit! Roll balls of 1 tablespoon sizes for the head and 2 tablespoon sizes for the body. You should end up with six heads and six bodies in order to make six snowmen. Although if you want them smaller, you could probably just half each part. Roll each into coconut before sticking them together (either just by pushing them onto of each other or with a tad of melted white chocolate).

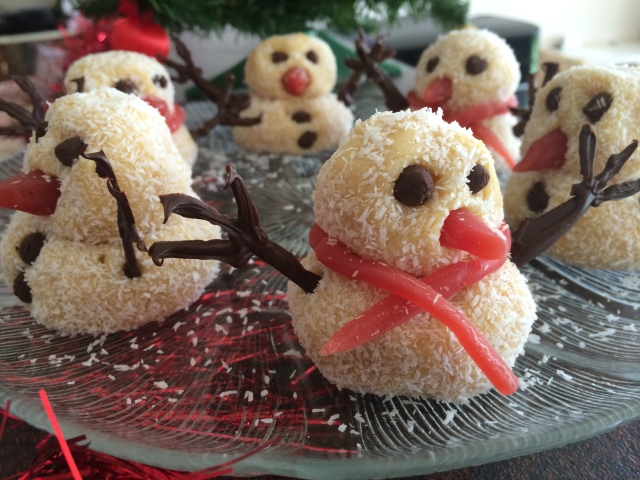
Next comes the fun part – decorating! I cut and rolled half a piece of strawberry liquorice into a nose shape to push into the heads of all the snowmen. For the eyes, you can use chocolate drops and push them into place. I added a few other drops on some of my snowmen for buttons. On the others I rolled a few strings of liquorice together to create a cute scarf.

The hands are a fun experience. You could use a pretzel stick to stick in but I was in the mood to make some cute hands by piping melted chocolate into hand shapes. As much as it is fun, you do need to make a few more than the you need as some are guaranteed to break.

But the end result is definitely worth it!

IMG_2414

I love how cute they are!! Plus they are really simple to create and very festive! Yay!

Keep smiling and build a snowman,

Kay Anne
5 Christmas Gifts in a Jar

Morning Beautifuls,

Its December now! I’m socially allowed to get exited for Christmas! Woohoo!!!

Which obviously means Christmas related blogs! Get ready for an onslaught of them up until Christmas – hopefully every Tuesday, Thursday and Sunday right up until Christmas Eve!!

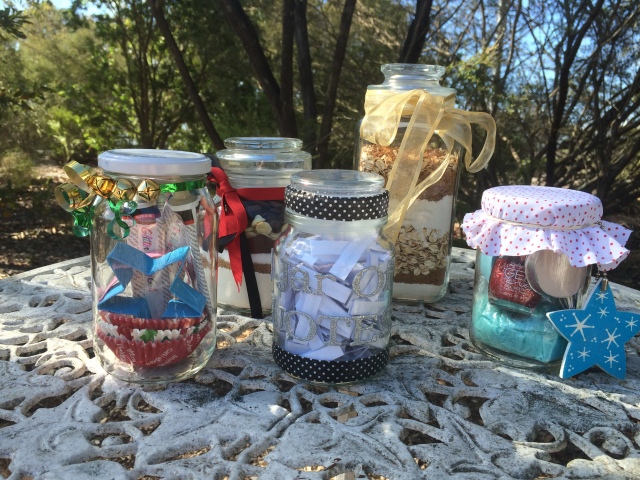
I have to start off with this post – it only seems fitting! This one has to be one of my favourite blogs ever as I love the idea of gift in jars! They have to be the most amazing idea and can become such creative outlets. I’m so excited to share with you five of my favourite Jar Gifts that I have made!

Now, most of these will work with any sized jars – including finished jam jars! I think glass ones look better than plastic ones and love the ones with slight detail on them or the complete opposite – very plain ones that I can decorate. Just, with both of the baking ones, you may need to tweak the ratios of the ingredients depending on the sizes of the containers. I would recommend a 1 litre container or a half a litre container, but any size works – there just may be a bit of maths included!

But lets get one with the awesome ideas!!! Woohoo!!

IMG_1333

(I don’t know where to start!)

IMG_1340_2

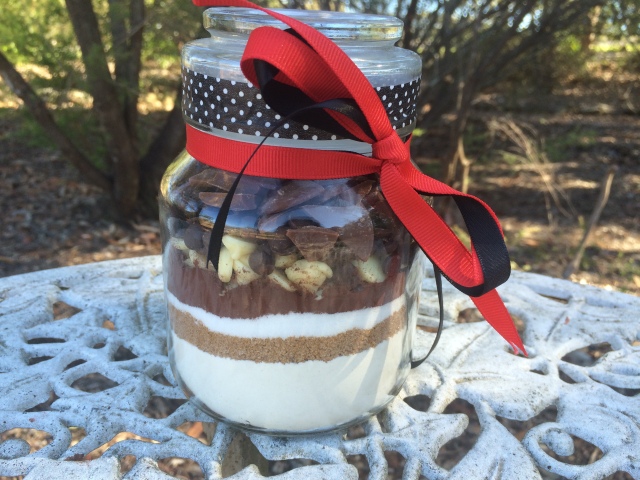
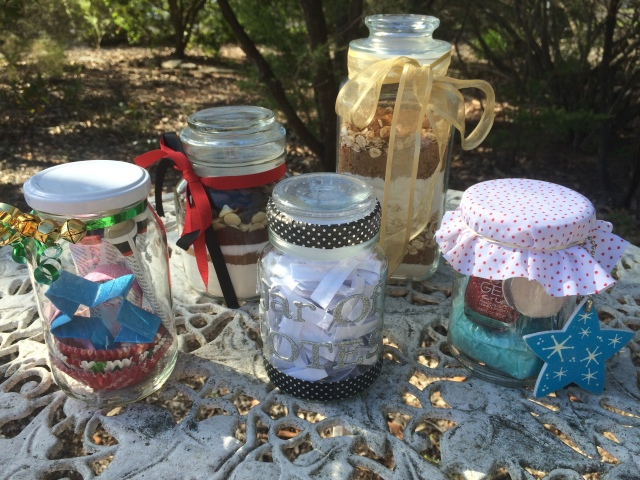
The first one I want to start with is Triple Chocolate Chip Cookies in a Jar. I tweaked this from a few different recipes, so fingers crossed it’ll work out. I’m quietly confident though – I mean you can’t go wrong with chocolate, right? For this one, I had to half the ingredients for it to fit into the jar I picked. However, for the sake of this blog post, I’ll give you the 1L equivalent.

So, all you need to do is layer the ingredients in the following order:

  • 1 3/4 cups plain flour mixed with 1tsp baking powder and 1tsp baking soda
  • 3/4 cup brown sugar
  • 1/2 cup white sugar
  • 1/4 cup cocoa
  • However much is necessary to fill your container of milk, dark and white chocolate.

I found funnel and spoon extremely helpful in getting all the ingredients in the jar, although if you’re a bit more skilled than I am, measuring jugs could work just as well.

In a tag, attach the following instructions:

Preheat oven to 180 degrees Celsius. Empty cookie mix into a large bowl.
Mix with 3/4 cup softened butter, 1 egg and 1 tsp of vanilla essence.
Shape into balls and cook for 11-13 minutes.
Enjoy with a Merry Christmas!

Woohoo!! First jar done! Lets move onto the next one!

IMG_1337

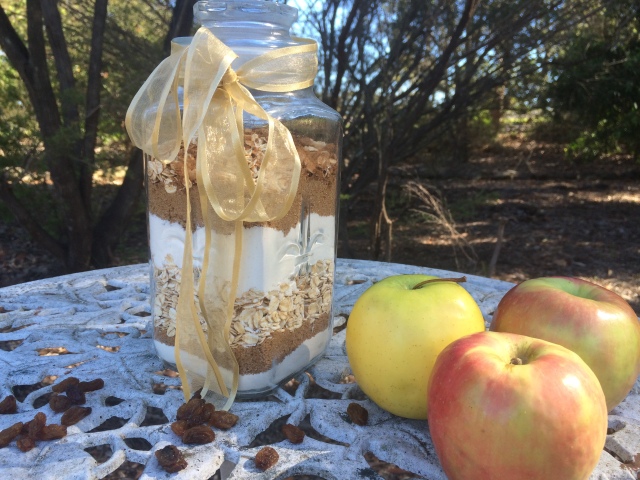
The second baking related jar I made was a Apple Crumble Mix Jar. I think this is a gorgeous Christmas-themed present and it makes a perfect apple crumble! Ugh, my mouth is watering just thinking about it!

What you need to layer:

  • 1/2 cup flour
  • 2/3 cup brown sugar
  • 1 cup oats
  • 1/2 cup flour
  • 2/3 cup brown sugar
  • 1/4 cup oats
  • 2 tsp cinnamon and 2tsp nutmeg.

You can put both sugars and flour together to make thicker layers but I really loved it with the thinner layers. I also had a bit of room at the top of mine – I forgot to check what size the container was before starting – but plan to add some dried fruits – maybe cranberries or sultanas closer to giving it away. I think this would add a lovely christmassy feel and give the apple crumble a different, brighter flavour!

Anyway, for the label:

Preheat oven to 180 degree Celsius.
Peel and slice 4-8 apples and lay them in a baking dish.
Pour contents of jar into a bowl. Mix 1/3 cup of butter and mix until crumbly.
Sprinkle over top of apples and cook for 30mins.
Enjoy warm with ice cream or cream and a Happy Christmas!

IMG_1344

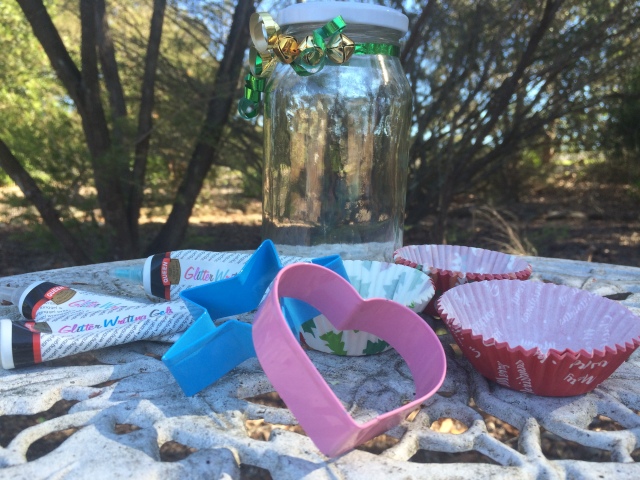
Moving on to other types of jars! The third idea is still baking related but doesn’t include the use of any ingredients (or anything that can make a absolute mess!). All you need for this one is some baking supplies and a cute tin and you are good to go!

What I put in mine are just some suggestions as there are limitless things you could place in this depending on the size and shape of your jar and who you were given it to. It took me a while to figure out this jars contents but in the end I decided with:

  • A variety of Christmas Cupcake Cases
  • Two Christmassy themed cookie cutters
  • Glitter icing pens/tubes

As a stocking filler or a cute baking utilities present, this is a super great idea for that chef in your family who knows every recipe! Plus, if you look around in some of the stores, you would be surprised at the fun little kitchen gadgets you can find. Like Strawberry top removers!

IMG_1346_2

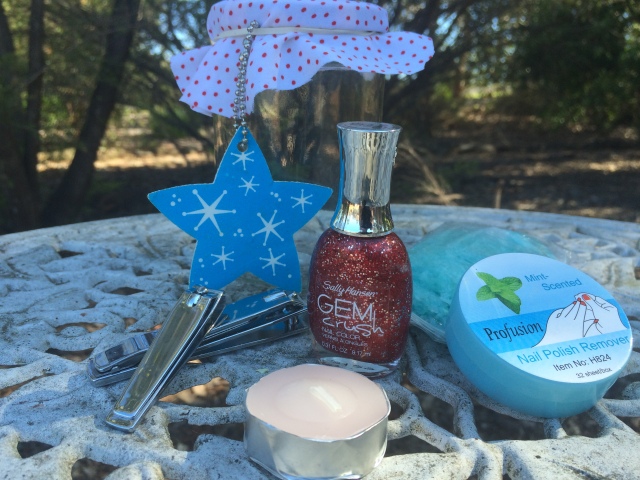
The next jar is a manicure/pedicure set and is a super quick and cute idea with heaps of different things to place and display inside!

Keeping mine slightly simple but still Christmassy and cute, I decided to place into mine:

  • Mint scented bath/feet scrub crystals
  • Mint scented nail polish remover
  • A pair of nail clippers
  • A cute peach scented tea light (side note: peach scented things smell amazing!)
  • Sparkly red nail polish (you could go for any colour but I thought red sparkles just screamed Christmas!)

After placing them inside, and finally finding another use of my ability to use chopsticks, I then covered the tin lid with a cute red and white polka dotted material cut into a circle. To this I attached a nail file in the shape of a star which I thought really added to the Christmas feel and still encompassing with the theme.

IMG_1342_2

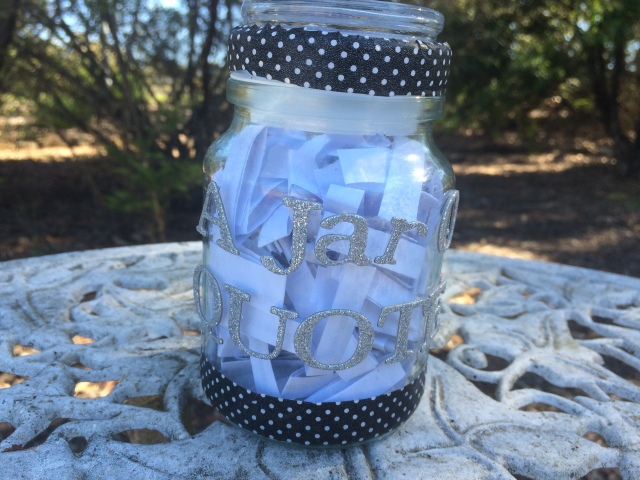
Final jar is more of a sentimental jar that I really wanted to make for one of my friends. She is really into quotes and when I had this idea I couldn’t believe I hadn’t thought of it earlier – like six years ago. Funnily enough, this jar took the longest for me to make – searching the internet for suitable quotes, collaborating them, printing them out and putting them all in the jar took longer than I expected. After adding a bit of wasabi tape for decorating and using silver glitter letters to write ‘A Jar Of Quotes’, the jar was finally finished.

I am in love with the final result. I was hoping to add 200ish quotes into the jar but they didn’t all fit – which shows my lack of spatial awareness. You could do 52 quotes – one for each week of the year – or even 365 – one for each day of the year – or, like me, just add as many as your jar will hold. I have to admit, I am the most proud of this jar.

IMG_1335

Anyway! I really hope you enjoyed this blog and it gave you some inspiration for Christmas gifts! I really think they are an incredible idea and love using them at Christmas time. Some can even work for birthdays!!

Keep smiling and get excited for Christmas!!

Kay Anne
DIY Christmas Advent Calendar

Morning Beautifuls,

I would love to take credit for this incredible Christmas gift idea, but that would have to go to my amazing friend. Last year, to help me with inspiration of blogs through December, my awesome and fabulous friend gave me a personalised Beauty Calendar filled with incredible things that I had never tried and, as I opened them throughout the days, became more and more excited to use. Which reminds me – there were a few products in the I wanted to ask her where she got them from so I can restock. Not only is it an amazing way of getting introduced to new products it is a incredible Christmas idea.
Which is why this year I wanted to reciprocate to favour (that is the correct work, right?).
So I gathered all the shopping and Christmasy vibes inside me – early – and went out shopping for my Advent Calender for her.

Now, Stephie, m’dear, if you are reading this you are not allowed past this point. Don’t you think about looking at the pictures. Spoiler alert. Majorly.

I’m super excited to show you how I organised, explored and put together this Advent Calendar. It was so much fun that I would love to do one for every person I know. Just maybe not this year!

This first thing I did was a lot of research. From setting out the box to the actual items but in the box, I scrolled through pages and pages of catogues and YouTube content. Both got super helpful stuff but mostly because I could.

Then I got to go shopping. I never realised how much fun beauty shopping could be, picking up strange, new products to sniff, study and then pick. By the end of it, my brain was so confused by the amount of different scents. But it was incredible.
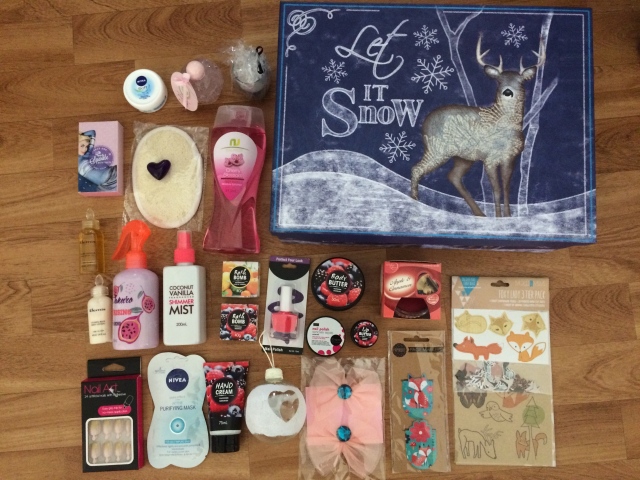
Finally I had my 25 products. Or well, what I will show you, 24. Product 25 is a secret. Just in case.

IMG_0920_2

After laying them all on the floor to snap that picture, I decided it was time to organise them, to figure out what came first. I probably made this harder than it should be – I mean random selection right? – but it took me quite a while to get them in a good order. Also I’ll probably just name most of them only giving an explanation and prices for my favourite (or we will be here a very long time!)
I put them I groups of five to make it easier to explain/show each item.

IMG_0922

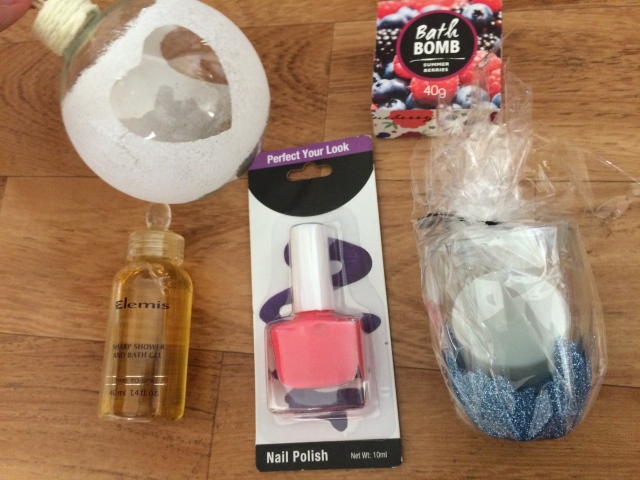
1. Snow Heart Decoration – this was the last thing I picked up and probably one of the most random. It was cute!! It was $3 from Target and I COULD NOT WALK PAST IT. I mean, how else to get someone in the Christmas spirit than giving them a decoration, right?
2. Elemis Shower and Bath Gel (travel sized)
3. Baby Pink Nail Polish
4. Bath Bomb ‘Summer Berries’
5. Ombre Glitter candle holder (+ battery candle)

IMG_0924_2

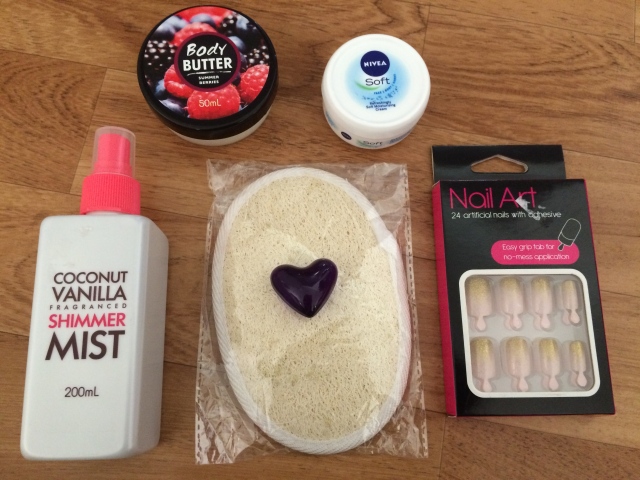
6. Body Butter ‘Summer Berries’
7. Nivea Moisturising Cream
8. Shimmer Mist ‘Coconut and Vanilla’ (that is a heavenly combination btw)
9. Bath Scrub + Cute heart bath gel
10. Fake Nails – I was actually going to buy these ones regardless of the price as they are super cute and perfect for quick nails, however when I got to the cash register, they ran up for only $2!! Perfect bargain!! I love the subtle pink colour and the glitter on the tips as they look super sophisticated. Plus, the tabs make them that extra bit easy to glue in perfectly!

IMG_0926

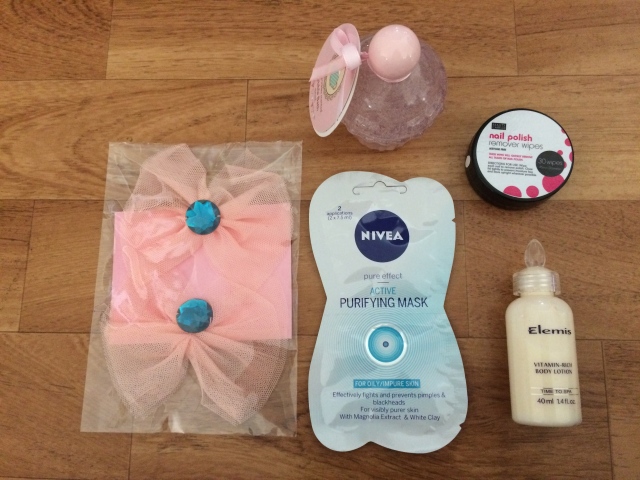
11. Bow Clips
12. Nivea Face Mask – these masks are incredible!! They are the only face masks I buy on a regular basis and are perfect at cleansing and moisturising your skin. I absolutely love them to death!!
13. Elemis Body Lotion (travel sized)
14. Nail polish remover wipes – or as I see them, the less messy, more easy way to remove nail polish
15. Bubble Bath (in a flipping Cupcake-shaped container!!!! Probably the only real reason I bought it)

IMG_0928

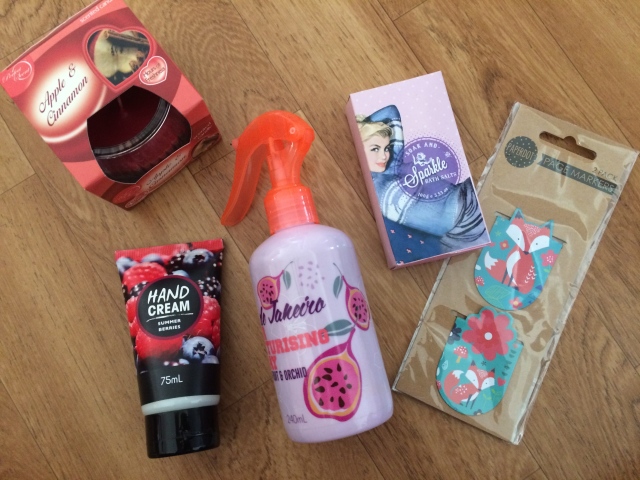
16. Scented Candle ‘Cinnamon Apple’ (one of my favourite Christmas related scents)
17. Hand cream ‘Summer Berries’
18. Soak and Sparkle Bath Salts (which I had to ‘fix’ because the stupid container it was in had it stuck in and the box ripped slightly on the bottom. Nothing coloured tape couldn’t fix!)
19. Hair Moisturising Spray (I think it was Coconut and Orchid Scent) – this is one of the products I am interested to see what she thinks of.
20. Fox Bookmarks – what? They were cute and she reads!

IMG_0930

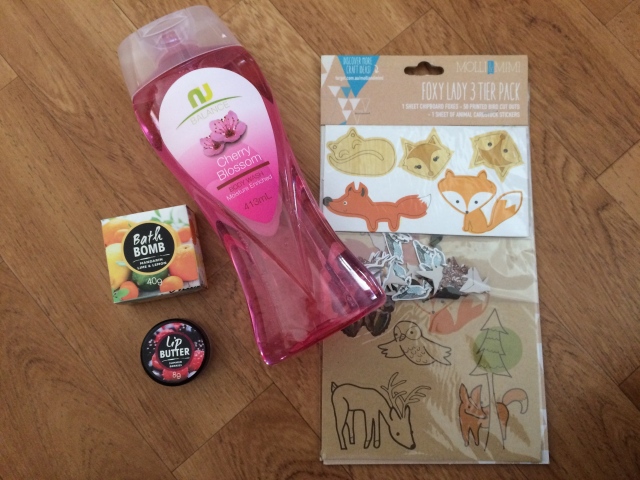
21. Lip Butter ‘Summer Berries’
22. Bath Bomb ‘Mandarin, Lime & Lemon’
23. ‘Cherry Blossom’ Body Wash (Which smells amazing!)
24. Fox Craft pack – Like I said before, she likes foxes!
25. ???? – WHO KNOWS (Well, I do!)

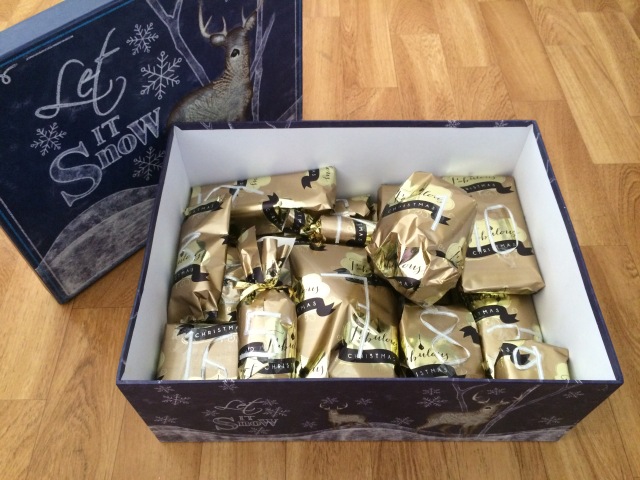
Next you get to wrap them all and label them with their numbers. I used ribbon for most their numbers as I thought this was a really cool way of labelling them. You can also use stickers, tape, labels or even just a permanent marker! Put them in a super cute box and its all complete!

IMG_0935_2

I am so excited for December to start so that I can give this to her!! I really do think this is a PERFECT present for nearly anyone – all you have to do is tweak your gifts to what they will like!

Keep smiling (and get excited for Christmas!),

Kay Anne.

12th Blog of Christmas: Food!

Morning Beautifuls,

MERRY CHRISTMAS! I honestly hope that you had/are having an incredible day however you are spending it!

Christmas is a time of joy, happiness and love, to understand what you have will never go away. It is a time for appreciation of 2014, of all the things that happened, because there are always incredible times for you to remember. It is a time of bonding, of saying ‘thank you’ to those around you, who have positively shaped you in every way possible. Who helped you become who you are today.

So I really do hope you are spending your Christmas in the best way possible. Obviously, including food. Lots and lots of food. I find it really cool how different families have different traditions at Christmas – it really does show the diversity and wonderfulness of this world!

Therefore, for the 12th and final blog of Christmas, the blog posts to see…

  • Twelve Festive Foods
  • Eleven Sparkly Lights
  • Ten Christmas Bon Bons
  • Nine Christmas Carols
  • Eight Advent Samples
  • Seven Beauty Products
  • Six Christmas Outfits
  • Five Festive Hairdos
  • Four Present Ideas
  • Three Homemade Cards
  • Two Christmas Films
  • And a pretty awesome Christmas Tree

Yup, today I’m going to share with you twelve of my family’s staple Christmas foods. It’s been ages since we have had a Christmas at home – usually we’re off on some crazy adventure, doing the mass family Christmas party on Boxing Day. See what I mean? Unusual traditions.

But this year, we changed it up, spending the days up to Christmas travelling, coming back for Christmas and Boxing Day before leaving again for another unknown adventure.

However, wherever we are, whether we’re in the middle of nowhere, up at Uncles’ and Aunts’ houses or stuck somewhere overseas, we always try to stick with some kind of traditional festive food. Seeming that it is 9:30 at night and I am practically boiling in my shirt and shorts, our Australian Christmas feast is going to be on the cold side of things. Yes, I’m talking about the shrimp on the barbie.

FYI, I have never heard anyone call them that here. They’re prawns. Not shrimp! But I guess that makes it food number one on our traditional Christmas food list. Prawns.

DSC03492 DSC03493

Going in a crazy weird order, we always have to have some kind of salad, usually consisting on the Christmas-y colours – our reds and greens. As it is Christmas, we might as well get all festive with our food just for corny, comedic effect. This means carrot, tomatoes, celery and cucumber!

DSC03490 DSC03489

Now I don’t actually have pictures for food number three and four. Mainly because they got eaten before I could take a picture. Thanks family. But another staple for Christmas is Mince Pies and Fruit Cake. I remember growing up my Grandma every year used to make us a Christmas Fruit Cake no matter where we were or where we were going. Before we went away, we would go over and pick it up, taking it with us just to eat on Christmas day. Oh, her house used to smell like fresh Fruit Cake, making Christmas seem so real, so perfect, so alive. Even now, both those traditional Christmas foods are a staple to our table. Just don’t forget the custard!

Cheese platter! You cannot have a Christmas at our house without a cheese platter! They are the best things in the world and usually consist of Gouda, Tasty, Camembert and some kind of cream cheese… usually chives! Yum, yum, yum! They disappear within seconds at my house!

DSC03483 DSC03487 DSC03486 DSC03485 DSC03484

I’m half way! Number six is our traditional Coconut Ice. Every year, at Christmas, someone in our house makes coconut ice – white and pink! It is the best! Again, it wouldn’t be Christmas without it! I am hoping you all know what coconut ice is… if not, you are definitely missing out!

DSC03163 DSC03160 DSC03161

Number seven is a healthy hit – usually because we feel a bit sweet-toothed after all the coconut ice we have managed to eat in record time.

It is tradition at our house that Christmas is the first time we usually buy and eat all the stone fruit – obviously spurting slightly from then on. Peaches, plums, nectarines, cherries, apricots, you name it! This is the time of year we have them all! Breakfast, lunch and dinner!

Which ties in nicely with food (or drink) number eight. Punches. Every year I like to make a concoction of whatever drinks we bought for Christmas, adding fruits and ices and colours depending what the cupboards hold. This year I kept it simple – and cool – with a sparkling apple juice with cherries and a cloudy sparkling pear juice! These were really quick to make as they only consisted of the juice of my picking, soda water (for a fizz!) and some sliced fruit! Quick, easy and refreshing!

DSC03494 DSC03496 DSC03495

We up to nine? I think so. Ice-cream is a necessity in our house at Christmas. Usually, we eat so much at lunch that by dinner we don’t want anything to eat, settling down with a bowl full of our favourite ice-cream, watching a Christmas movie as a family. My favourite ice-cream, you ask? Hands down Cookies and Cream. Nothing can beat that!

Breakfast. My favourite meal of the day. Homemade pancakes.

What can I say except yum! Especially with banana, drizzled in maple syrup and cream…

DSC02467 DSC02466

Number eleven is something I always have, regardless of the weather (and is probably a factor contributing to my overheating at the moment). You cannot, and I repeat cannot, have a Christmas without a warm beverage of some type. Mine, you’ve probably guessed it, is a hot chocolate – extra marshmallows! I mean, Christmas only comes around once a year!

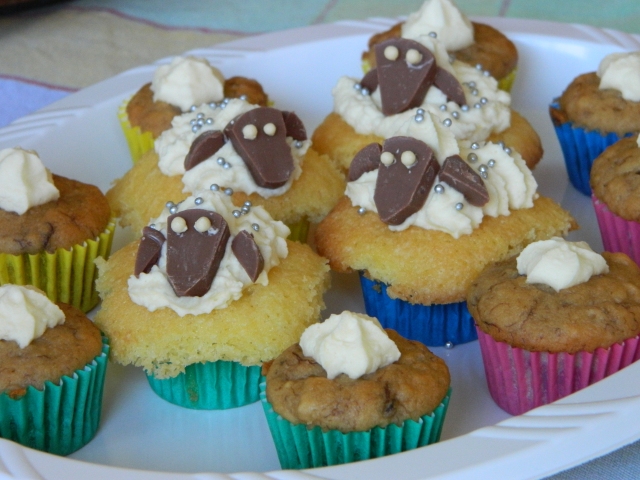
Number twelve is my favourite! Cupcakes!!! This is one thing I always bake for Christmas every year, making certain I make enough to take anywhere we plan on going around Christmas. If you invite me over, don’t be surprised if I come armed with cupcakes.

I have to admit, some of my favourites this year are not that Christmas-y, but they sure do look cute! Sheep cupcakes! I can pass them off as Christmas cupcakes, I’ll argue with you if you try and disagree. The shepherds who visited Jesus had sheep. Hence they are Christmas. I mean, how cute do they look!

DSCN1175

I guess, that is it. I have come to the end of my final Christmas blog. wow, I’m going to miss doing these blogs.

I really hope you have had the most amazing Christmas, wherever you are, however you celebrate.

Merry Christmas! May it be the best one yet!

Kay Anne
xx

11th Blog of Christmas: Lights

Morning Beautifuls!

There is one Christmas tradition that excites me every year.

Christmas Lights.

So I thought it only fitting to give to you a whole post on Christmas lights. Not much writing just pictures.

Which means that on this 11th blog of Christmas the blog posts to see are..

  • Eleven Sparkly Lights
  • Ten Christmas Bon Bons
  • Nine Christmas Carols
  • Eight Advent Samples
  • Seven Beauty Products
  • Six Christmas Outfits
  • Five Festive Hairdos
  • Four Present Ideas
  • Three Homemade Cards
  • Two Christmas Films
  • And a pretty awesome Christmas Tree

I have to admit, my one downfall in photo taking is attempting to photograph lights at night. It is the most difficult thing in the world. Most of the pictures I take come out like this:

DSCN2706

Yup, that good. So apologies if these aren’t the most spectacular photographs in the world. But I gave it my best try (and I just LOVE Christmas Lights).

Around Christmas, lights always put me in a excited, happy mood, so I have gone through my collection (and on our Christmas Light tour tonight, I added some more) and picked out my favourite Christmas lights! So make yourself a warm cocoa, snuggle up in a blanket, sit back and enjoy eleven Christmas Lights.

DSCN2703 DSCN2704 DSCN2699 DSCN2696 OLYMPUS DIGITAL CAMERA DSCN2698 OLYMPUS DIGITAL CAMERA OLYMPUS DIGITAL CAMERA OLYMPUS DIGITAL CAMERAOLYMPUS DIGITAL CAMERA OLYMPUS DIGITAL CAMERA

Oh, and just because it is Christmas, here is an extra photo. Have Tigger in a Christmas hat. Random, I know. But it’s Tigger. Everyone loves Tigger.

OLYMPUS DIGITAL CAMERA

One more sleep to go!!!! It would be an understatement to say I was excited!

Keep smiling and keep merry!

Kay Anne 🙂